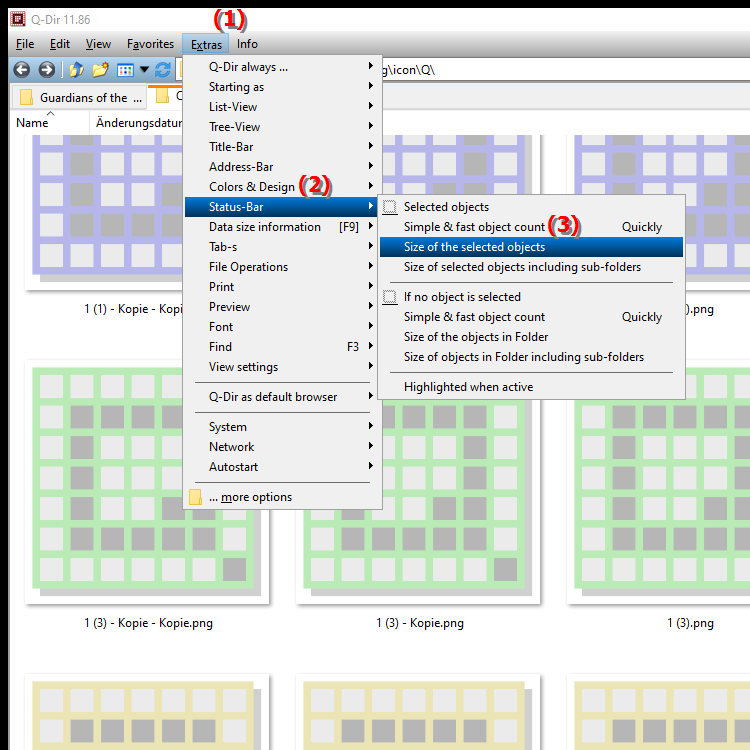
This option displays the total size of the currently selected files and folders in the status bar. This is especially useful for seeing at a glance how much space the selected items are taking up.
To enable this option, look for it in the menu.:
▶ Menü ▶ E&xtras ▶ Status-Bar ▶ Size of the selected objects
▶ **Benefits of displaying the size of marked items in the status bar of Q-Dir's File Explorer:**
▶ **Sample usage scenarios:**

**Benefits of displaying the size of marked items in the status bar of Q-Dir's File Explorer:**
- Quick Overview: Users can instantly see how much space the selected items are taking up, making it easier to manage files and folders.
- Storage Space Optimization: Displaying the total size helps users better assess whether they should delete or archive files to free up storage space.
- Easy Decision Making: Users can quickly decide whether to keep or remove large files based on the size information displayed.
▶ User questions about size of selected objects in File Explorer and answers:
**Sample usage scenarios:**
1. Before data cleanup: A user wants to clean up his files and looks at the size of the marked files to decide which ones can be deleted to save storage space.
2. When preparing for backup: Before a backup is performed, the user can check the size of the marked folders to make sure there is enough space on the destination media.
3. When organizing files: While organizing photos or documents, the user can quickly determine if he has accidentally selected several large files that he would rather manage individually.
User questions about size of selected objects in File Explorer and answers:
1. Question: How can I quickly view the size of marked items in Windows File Explorer?
Answer: In Windows File Explorer, you can view the size of marked items by enabling the status bar. Go to Menu > Tools > Status Bar and enable the "Size of Marked Items" option. This will display the total size of the selected files and folders in the status bar.
2. Question: What are the benefits of displaying the size of selected items in Windows File Explorer?
Answer: Displaying the size of selected items in Windows File Explorer allows users to quickly see how much space the selected files are taking up. This helps in making decisions about deleting or moving files to optimize storage.
3. Question: How can I customize the status bar in File Explorer to show the size of the selected items?
Answer: To customize the status bar in Windows File Explorer, click Menu > Tools > Status Bar. There you can enable the "Size of selected items" option to show the total size of the currently selected files.
4. Question: What scenarios might benefit from the Show Size of Marked Items feature in File Explorer?
Answer: Scenarios where Show Size of Marked Items is helpful include: 1) Cleaning up disk space by identifying large files, 2) Preparing backups to ensure there is enough disk space, and 3) Organizing documents or pictures to avoid accidentally making large file selections.
5. Question: Is there a way to see the size of highlighted items in File Explorer without opening the files?
Answer: Yes, in Windows File Explorer the size of highlighted items is shown in the status bar without having to open the files. To do this, simply enable the status bar via Menu > Tools > Status Bar.
6. Question: How does displaying the size of marked items in File Explorer help me manage disk space?
Answer: Displaying the size of marked items in Windows File Explorer gives you a quick overview of the disk space that the selected files are taking up. This makes managing disk space easier because you can specifically identify large files that may need to be deleted or archived.
7. Question: What settings need to be made to display the size of the selected objects in the File Explorer?
Answer: To display the size of the selected objects in the Windows File Explorer, go to Menu > Tools > Status Bar and activate the "Size of selected objects" option. This setting ensures that the total size of the selected files and folders is visible in the status bar.
8. Question: How can I use the Show Size of Marked Items feature in File Explorer effectively?
Answer: Use the Show Size of Marked Items feature in Windows File Explorer to check the size of files before deleting or moving them. This information will help you manage storage space efficiently and avoid unexpected data loss.
9. Question: Can I filter the size of the highlighted items in File Explorer for specific file types?
Answer: While the default feature in Windows File Explorer shows the total size of all highlighted items, you can customize the visibility of specific file types by using the search filters. This helps you isolate the files you want and check their size.
10. Question: Why should I regularly check the size of marked items in Windows File Explorer?
Answer: Regularly checking the size of marked items in Windows File Explorer helps you keep track of your storage space. By identifying large files, you can make informed decisions to free up storage space and optimize system performance.
Keywords: translate, status bar, selected, current, view, a, particularly, marked, explorer, displayed, folder, total, size, explanation, files, storage, claim, recognize, option, file, question, useful, objects, shows, these, size, elements , Windows 10, 11, 12, 7, 8.1